OAuth Application Workflow with Laravel Passport
Our API allows you to programmatically interact with TrimLink services using secure access tokens or registered OAuth applications.
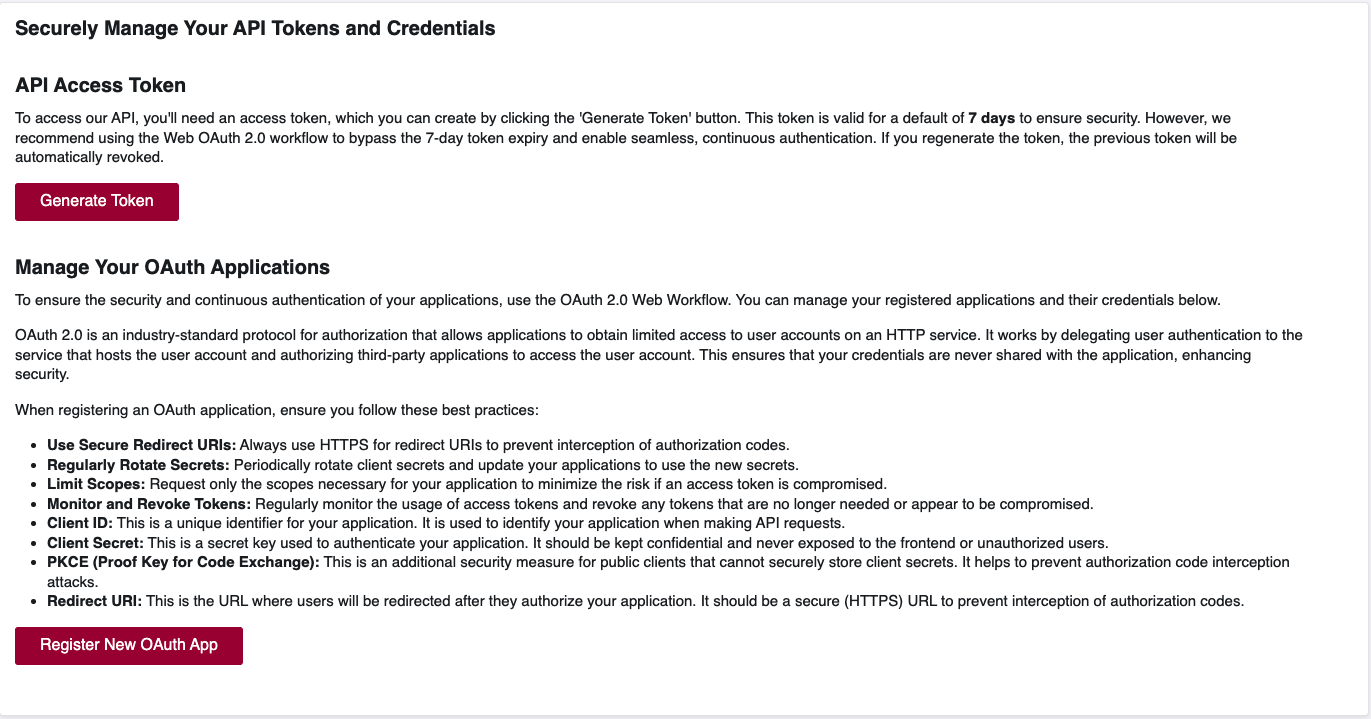
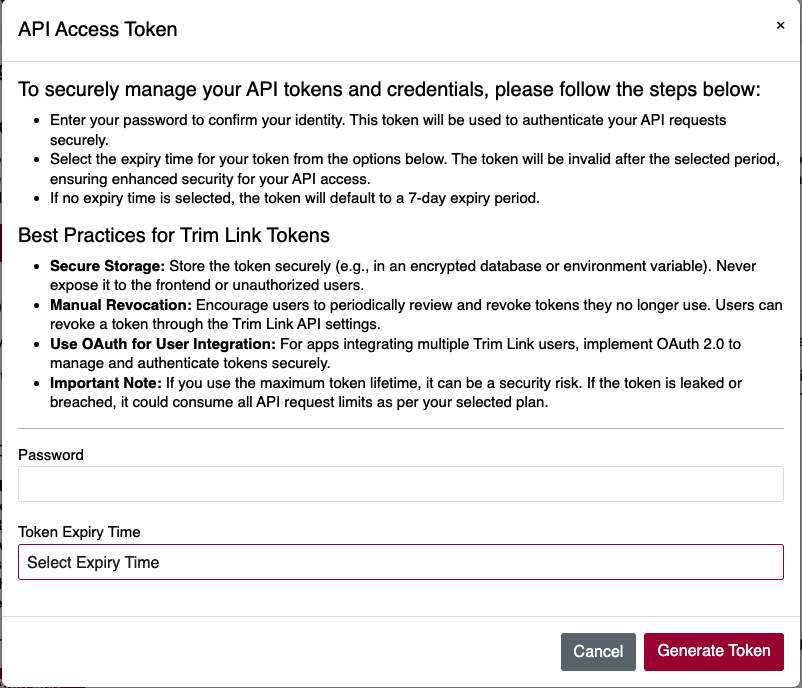
🎯 Generate API Access Token
To begin using our API, you’ll need an access token. Here’s how you can generate one:
- Click on the Generate Token button.
- A popup will appear asking for:
- Your password (to confirm your identity).
- An optional token expiry time (defaults to 7 days if not selected).
This token will be used in your API request headers for authentication.
✅ Best Practices for API Tokens
- 🔒 Secure Storage: Store tokens securely in environment variables or encrypted storage.
- ♻️ Manual Revocation: Periodically review and revoke old or unused tokens.
- 🧠 Use OAuth for User Integration: For apps with multiple users, prefer OAuth-based flow.
- ⚠️ Important Note: Avoid long-lived tokens unless necessary. A leaked token can be exploited.
📷 Generate Token - Visual Reference
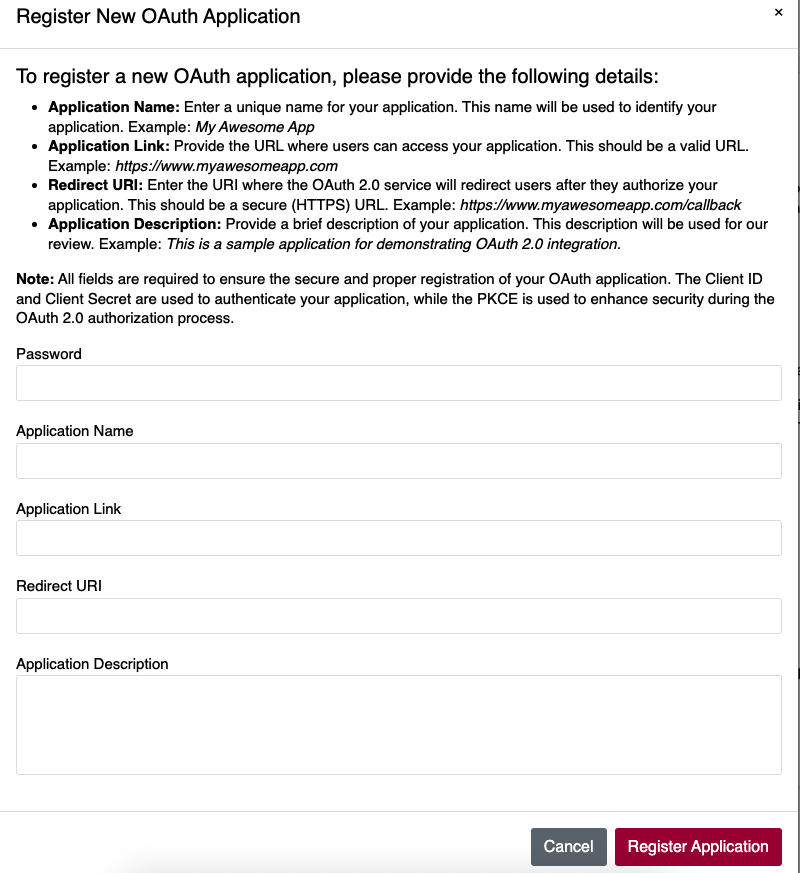
🔑 Register OAuth Application
If your app requires users to log in and securely access their data, register an OAuth 2.0 application.
Click the Register New OAuth App button to open the registration modal. You’ll need to provide:
- 🔐 Password (for authentication)
- 📝 Application Name (e.g. My Awesome App)
- 🌐 Application Link (e.g. https://yourapp.com)
- 🔁 Redirect URI (e.g. https://yourapp.com/callback)
- 🧾 Application Description (brief purpose of the app)
🔒 Best Practices for OAuth Apps
- Use HTTPS Redirect URIs to prevent interception
- Regularly rotate client secrets
- Request only necessary scopes
- Monitor and revoke unused tokens
- Implement PKCE for public clients like mobile apps
📷 Register OAuth Application - Visual Reference
🚀 Next Step
Once your token or OAuth app is set up, you can start integrating your systems or landing pages with your own branded experience — fully authenticated, secure, and analytics-ready.
Ready to make your API calls? Your integration starts here. 🔗 -->
OAuth Application Workflow with Laravel Passport
Table of Contents
- Introduction
- Prerequisites
- Step 1: Register Your OAuth Application
- Step 2: OAuth Authorization Flow
- Step 3: Handling the Callback
- Step 4: Making Authenticated API Calls
- Code Examples by Platform
- Error Handling
- Security Best Practices
- Troubleshooting
Introduction
This document provides a comprehensive guide on how to integrate your application with our OAuth 2.0 service using Laravel Passport. Our implementation supports the Authorization Code Grant type, which is the most secure OAuth 2.0 flow for applications that can securely store client secrets.
What You'll Learn
- How to register your application as an OAuth client
- How to implement the OAuth 2.0 Authorization Code flow
- How to handle callbacks and exchange authorization codes for access tokens
- How to make authenticated API requests
- Platform-specific implementation examples (PHP, Python, Node.js)
Prerequisites
Before you begin, ensure you have:
- A registered account on our platform
- Access to the API Integration dashboard
- Basic understanding of OAuth 2.0 concepts
- A web application capable of handling HTTP redirects
- HTTPS endpoint for your redirect URI (required for production)
Step 1: Register Your OAuth Application
1.1 Access the API Integration Dashboard
- Log in to your account
- Navigate to Dashboard → Integration
- Scroll down to the "Manage Your OAuth Applications" section
Screenshot: OAuth Applications management interface
1.2 Register a New OAuth Application
Click the "Register New OAuth App" button to open the registration modal.
Screenshot: OAuth application registration form
1.3 Fill in Application Details
Provide the following information:
| Field | Description | Example |
|---|---|---|
| Password | Your account password for verification | your_account_password |
| Application Name | A unique name for your application | My Awesome App |
| Application Link | Your application's main URL | https://www.myawesomeapp.com |
| Redirect URI | OAuth callback URL (must be HTTPS) | https://www.myawesomeapp.com/auth/callback |
| Application Description | Brief description of your app | URL shortening integration for my app |
1.4 Important Notes
- Redirect URI: Must be an exact match when making authorization requests
- HTTPS Required: All redirect URIs must use HTTPS in production
- Client Secret: Will be generated automatically and displayed once
- Store Securely: Save your Client ID and Client Secret immediately
1.5 Application Registration Response
After successful registration, you'll receive:
{
  "client_id": "9a1b2c3d-4e5f-6a7b-8c9d-0e1f2a3b4c5d",
  "client_secret": "abcdef1234567890abcdef1234567890abcdef12",
  "app_name": "My Awesome App",
  "redirect_uri": "https://www.myawesomeapp.com/auth/callback",
  "auth_url": "https://trimlink.ai/app/authorize?grant_type=authorization_code&client_id=9a1b2c3d-4e5f-6a7b-8c9d-0e1f2a3b4c5d&redirect_uri=https://www.myawesomeapp.com/auth/callback&response_type=code&scope=*"
}
Screenshot: Successful OAuth application registration
Step 2: OAuth Authorization Flow
2.1 Authorization URL Structure
The authorization URL follows this format:
https://trimlink.ai/app/authorize?grant_type=authorization_code&client_id={CLIENT_ID}&redirect_uri={REDIRECT_URI}&response_type=code&scope=*
2.2 URL Parameters
| Parameter | Required | Description |
|---|---|---|
grant_type | Yes | Must be authorization_code |
client_id | Yes | Your application's Client ID |
redirect_uri | Yes | Must match registered redirect URI exactly |
response_type | Yes | Must be code |
scope | Yes | Use * for full access |
2.3 Initiating Authorization
Redirect your users to the authorization URL when they want to connect their account:
<a
  href="https://trimlink.ai/app/authorize?grant_type=authorization_code&client_id=YOUR_CLIENT_ID&redirect_uri=YOUR_REDIRECT_URI&response_type=code&scope=*"
  class="btn btn-primary">
  Connect with Trimlink
</a>
Screenshot: User authorization consent screen
2.4 User Authorization
- User clicks the authorization link
- They're redirected to our authorization server
- User logs in (if not already authenticated)
- User reviews and approves the permissions
- User is redirected back to your application with an authorization code
Step 3: Handling the Callback
3.1 Callback Response
After user authorization, they'll be redirected to your redirect_uri with:
Success Response:
https://www.myawesomeapp.com/auth/callback?code=def50200...&state=xyz123
Error Response:
https://www.myawesomeapp.com/auth/callback?error=access_denied&error_description=The+user+denied+the+request
3.2 Exchange Authorization Code for Access Token
Make a POST request to our token endpoint:
Endpoint: https://trimlink.ai/api/oauth/token
Request Body:
{
  "grant_type": "authorization_code",
  "client_id": "YOUR_CLIENT_ID",
  "client_secret": "YOUR_CLIENT_SECRET",
  "redirect_uri": "YOUR_REDIRECT_URI",
  "code": "AUTHORIZATION_CODE_FROM_CALLBACK"
}
Response:
{
  "token_type": "Bearer",
  "expires_in": 31536000,
  "access_token": "eyJ0eXAiOiJKV1QiLCJhbGciOiJSUzI1NiJ9...",
  "refresh_token": "def502001234567890abcdef..."
}
Screenshot: Token exchange process diagram
Step 4: Making Authenticated API Calls
4.1 API Authentication
Use the access token in the Authorization header for all API requests:
Authorization: Bearer YOUR_ACCESS_TOKEN
4.2 Available API Endpoints
| Endpoint | Method | Description |
|---|---|---|
/api/1.0/users/list-all-users | GET | List all users |
/api/1.0/short-urls/list-all-short-urls | GET | List all shortened URLs |
/api/1.0/short-urls/ | POST | Create a new short URL |
/api/1.0/domains/list-all-domains | GET | List custom domains |
4.3 Example API Request
curl -X GET "https://trimlink.ai/api/1.0/short-urls/list-all-short-urls" \
  -H "Authorization: Bearer YOUR_ACCESS_TOKEN" \
  -H "Accept: application/json"
Code Examples by Platform
PHP Implementation
<?php

class TrimLinkOAuthClient
{
    private $clientId;
    private $clientSecret;
    private $redirectUri;

    public function __construct($clientId, $clientSecret, $redirectUri)
    {
        $this->clientId = $clientId;
        $this->clientSecret = $clientSecret;
        $this->redirectUri = $redirectUri;
    }

    /**
     * Generate authorization URL
     */
    public function getAuthorizationUrl($state = null)
    {
        $params = [
            'grant_type' => 'authorization_code',
            'client_id' => $this->clientId,
            'redirect_uri' => $this->redirectUri,
            'response_type' => 'code',
            'scope' => '*'
        ];

        if ($state) {
            $params['state'] = $state;
        }

        return 'https://trimlink.ai/app/authorize?' . http_build_query($params);
    }

    /**
     * Exchange authorization code for access token
     */
    public function getAccessToken($authorizationCode)
    {
        $data = http_build_query([
            'grant_type' => 'authorization_code',
            'client_id' => $this->clientId,
            'client_secret' => $this->clientSecret,
            'redirect_uri' => $this->redirectUri,
            'code' => $authorizationCode
       ]);

       $ch = curl_init('https://trimlink.ai/api/oauth/token');
       curl_setopt_array($ch, [
            CURLOPT_RETURNTRANSFER => true,
            CURLOPT_POST => true,
            CURLOPT_POSTFIELDS => $data,
            CURLOPT_HTTPHEADER => [
                'Content-Type: application/x-www-form-urlencoded',
            ],
        ]);

        $response = curl_exec($ch);
        $httpCode = curl_getinfo($ch, CURLINFO_HTTP_CODE);
        curl_close($ch);

        if ($httpCode !== 200) {
            dd('Token exchange failed:', $response);
        }
        return json_decode($response, true);
    }

    /**
     * Make authenticated API request
     */
    public function makeApiRequest($endpoint, $method = 'GET', $data = null, $accessToken)
    {
        $ch = curl_init();
        curl_setopt($ch, CURLOPT_URL, 'https://trimlink.ai' . $endpoint);
        curl_setopt($ch, CURLOPT_CUSTOMREQUEST, $method);
        curl_setopt($ch, CURLOPT_HTTPHEADER, [
            'Authorization: Bearer ' . $accessToken,
            'Accept: application/json',
            'Content-Type: application/json'
        ]);
        curl_setopt($ch, CURLOPT_RETURNTRANSFER, true);

        if ($data && in_array($method, ['POST', 'PUT', 'PATCH'])) {
            curl_setopt($ch, CURLOPT_POSTFIELDS, json_encode($data));
        }

        $response = curl_exec($ch);
        $httpCode = curl_getinfo($ch, CURLINFO_HTTP_CODE);
        curl_close($ch);

        return [
            'status_code' => $httpCode,
            'body' => json_decode($response, true)
        ];
    }
}

// Usage Example
$oauth = new TrimLinkOAuthClient(
    'YOUR_CLIENT_ID',
    'YOUR_CLIENT_SECRET',
    'https://yourapp.com/auth/callback'
);

// Step 1: Redirect user to authorization URL
if (!isset($_GET['code'])) {
    $authUrl = $oauth->getAuthorizationUrl($_SESSION['oauth_state']);
    header('Location: ' . $authUrl);
    exit;
}

// Step 2: Handle callback and exchange code for token
try {
    $tokenData = $oauth->getAccessToken($_GET['code']);
    $accessToken = $tokenData['access_token'];

    // Store access token securely (database, session, etc.)
    $_SESSION['access_token'] = $accessToken;

    // Step 3: Make API requests
    $response = $oauth->makeApiRequest('/api/1.0/short-urls/list-all-short-urls', 'GET', null, $accessToken);

    if ($response['status_code'] === 200) {
        $shortUrls = $response['body'];
        // Process the data
    }

} catch (Exception $e) {
    echo 'OAuth Error: ' . $e->getMessage();
}
?>
Python Implementation
import requests
import urllib.parse
from typing import Dict, Optional

class TrimLinkOAuthClient:
    def __init__(self, client_id: str, client_secret: str, redirect_uri: str):
        self.client_id = client_id
        self.client_secret = client_secret
        self.redirect_uri = redirect_uri
        self.base_url = "https://trimlink.ai"

    def get_authorization_url(self, state: Optional[str] = None) -> str:
        """Generate authorization URL"""
        params = {
            'grant_type': 'authorization_code',
            'client_id': self.client_id,
            'redirect_uri': self.redirect_uri,
            'response_type': 'code',
            'scope': '*'
        }

        if state:
            params['state'] = state

        return f"{self.base_url}/app/authorize?{urllib.parse.urlencode(params)}"

    def get_access_token(self, authorization_code: str) -> Dict:
        """Exchange authorization code for access token"""
        data = {
            'grant_type': 'authorization_code',
            'client_id': self.client_id,
            'client_secret': self.client_secret,
            'redirect_uri': self.redirect_uri,
            'code': authorization_code
        }

        response = requests.post(
            f"{self.base_url}/api/oauth/token",
            json=data,
            headers={'Accept': 'application/json'}
        )

        if response.status_code != 200:
            raise Exception(f"Token exchange failed: {response.text}")

        return response.json()

    def make_api_request(self, endpoint: str, method: str = 'GET',
                        data: Optional[Dict] = None, access_token: str = None) -> Dict:
        """Make authenticated API request"""
        headers = {
            'Authorization': f'Bearer {access_token}',
            'Accept': 'application/json',
            'Content-Type': 'application/json'
        }

        url = f"{self.base_url}{endpoint}"

        if method.upper() == 'GET':
            response = requests.get(url, headers=headers)
        elif method.upper() == 'POST':
            response = requests.post(url, json=data, headers=headers)
        elif method.upper() == 'PUT':
            response = requests.put(url, json=data, headers=headers)
        elif method.upper() == 'DELETE':
            response = requests.delete(url, headers=headers)
        else:
            raise ValueError(f"Unsupported HTTP method: {method}")

        return {
            'status_code': response.status_code,
            'body': response.json() if response.content else None
        }

# Usage Example (Flask)
from flask import Flask, request, redirect, session

app = Flask(__name__)
app.secret_key = 'your-secret-key'

oauth = TrimLinkOAuthClient(
    client_id='YOUR_CLIENT_ID',
    client_secret='YOUR_CLIENT_SECRET',
    redirect_uri='https://yourapp.com/auth/callback'
)

@app.route('/auth/login')
def login():
    """Redirect to OAuth authorization"""
    auth_url = oauth.get_authorization_url()
    return redirect(auth_url)

@app.route('/auth/callback')
def callback():
    """Handle OAuth callback"""
    code = request.args.get('code')
    error = request.args.get('error')

    if error:
        return f"Authorization failed: {error}"

    try:
        # Exchange code for token
        token_data = oauth.get_access_token(code)
        session['access_token'] = token_data['access_token']

        # Make API request
        response = oauth.make_api_request(
            '/api/1.0/short-urls/list-all-short-urls',
            'GET',
            access_token=session['access_token']
        )

        if response['status_code'] == 200:
            return f"Success! Retrieved {len(response['body']['data'])} URLs"
        else:
            return f"API request failed: {response['body']}"

    except Exception as e:
        return f"OAuth error: {str(e)}"

if __name__ == '__main__':
    app.run(debug=True)
Node.js Implementation
const axios = require("axios");
const express = require("express");
const session = require("express-session");

class TrimLinkOAuthClient {
  constructor(clientId, clientSecret, redirectUri) {
    this.clientId = clientId;
    this.clientSecret = clientSecret;
    this.redirectUri = redirectUri;
    this.baseUrl = "https://trimlink.ai";
  }

  /**
   * Generate authorization URL
   */
  getAuthorizationUrl(state = null) {
    const params = new URLSearchParams({
      grant_type: "authorization_code",
      client_id: this.clientId,
      redirect_uri: this.redirectUri,
      response_type: "code",
      scope: "*",
    });

    if (state) {
      params.append("state", state);
    }

    return `${this.baseUrl}/app/authorize?${params.toString()}`;
  }

  /**
   * Exchange authorization code for access token
   */
  async getAccessToken(authorizationCode) {
    const data = {
      grant_type: "authorization_code",
      client_id: this.clientId,
      client_secret: this.clientSecret,
      redirect_uri: this.redirectUri,
      code: authorizationCode,
    };

    try {
      const response = await axios.post(
        `${this.baseUrl}/api/oauth/token`,
        data,
        {
          headers: {
            Accept: "application/json",
            "Content-Type": "application/json",
          },
        },
      );

      return response.data;
    } catch (error) {
      throw new Error(
        `Token exchange failed: ${error.response?.data || error.message}`,
      );
    }
  }

  /**
   * Make authenticated API request
   */
  async makeApiRequest(endpoint, method = "GET", data = null, accessToken) {
    const config = {
      method: method.toLowerCase(),
      url: `${this.baseUrl}${endpoint}`,
      headers: {
        Authorization: `Bearer ${accessToken}`,
        Accept: "application/json",
        "Content-Type": "application/json",
      },
    };

    if (data && ["post", "put", "patch"].includes(method.toLowerCase())) {
      config.data = data;
    }

    try {
      const response = await axios(config);
      return {
        statusCode: response.status,
        body: response.data,
      };
    } catch (error) {
      return {
        statusCode: error.response?.status || 500,
        body: error.response?.data || { message: error.message },
      };
    }
  }
}

// Usage Example (Express.js)
const app = express();

app.use(
  session({
    secret: "your-secret-key",
    resave: false,
    saveUninitialized: true,
  }),
);

const oauth = new TrimLinkOAuthClient(
  "YOUR_CLIENT_ID",
  "YOUR_CLIENT_SECRET",
  "https://yourapp.com/auth/callback",
);

// Route to initiate OAuth
app.get("/auth/login", (req, res) => {
  const authUrl = oauth.getAuthorizationUrl();
  res.redirect(authUrl);
});

// OAuth callback route
app.get("/auth/callback", async (req, res) => {
  const { code, error } = req.query;

  if (error) {
    return res.status(400).send(`Authorization failed: ${error}`);
  }

  try {
    // Exchange code for token
    const tokenData = await oauth.getAccessToken(code);
    req.session.accessToken = tokenData.access_token;

    // Make API request
    const response = await oauth.makeApiRequest(
      "/api/1.0/short-urls/list-all-short-urls",
      "GET",
      null,
      req.session.accessToken,
    );

    if (response.statusCode === 200) {
      res.json({
        message: "Success!",
        data: response.body,
      });
    } else {
      res.status(response.statusCode).json(response.body);
    }
  } catch (error) {
    res.status(500).send(`OAuth error: ${error.message}`);
  }
});

// Protected API route example
app.get("/api/urls", async (req, res) => {
  if (!req.session.accessToken) {
    return res.status(401).json({ error: "Not authenticated" });
  }

  try {
    const response = await oauth.makeApiRequest(
      "/api/1.0/short-urls/list-all-short-urls",
      "GET",
      null,
      req.session.accessToken,
    );

    res.status(response.statusCode).json(response.body);
  } catch (error) {
    res.status(500).json({ error: error.message });
  }
});

app.listen(3000, () => {
  console.log("Server running on http://localhost:3000");
});
Error Handling
Common Error Responses
| Error Code | Description | Solution |
|---|---|---|
400 | Bad Request | Check request parameters |
401 | Unauthorized | Verify access token is valid |
403 | Forbidden | Check user permissions |
404 | Not Found | Verify endpoint URL |
422 | Validation Error | Check required fields |
429 | Rate Limited | Implement retry logic with backoff |
500 | Server Error | Contact support if persistent |
OAuth-Specific Errors
| Error | Description | Action |
|---|---|---|
invalid_client | Invalid client credentials | Verify Client ID and Secret |
invalid_grant | Invalid authorization code | Request new authorization |
invalid_scope | Invalid scope requested | Use valid scope values |
access_denied | User denied authorization | Handle gracefully in UI |
Screenshot: Error handling best practices
Security Best Practices
1. Client Secret Protection
- Never expose client secrets in frontend code
- Store secrets securely on your server
- Use environment variables for configuration
- Rotate secrets periodically
2. Redirect URI Validation
- Use exact URI matching
- Always use HTTPS in production
- Validate redirect URIs on your server
- Avoid using wildcards or dynamic URIs
3. State Parameter
- Always include a state parameter
- Use cryptographically secure random values
- Validate state parameter in callback
- Helps prevent CSRF attacks
4. Token Storage
- Store access tokens securely
- Use encrypted storage where possible
- Implement token refresh logic
- Clear tokens on logout
5. HTTPS Requirements
- Use HTTPS for all OAuth endpoints
- Secure your redirect URIs with HTTPS
- Validate SSL certificates
Screenshot: Security implementation checklist
Troubleshooting
Issue: "Invalid Redirect URI"
Cause: The redirect URI in your request doesn't match the registered URI exactly.
Solution:
- Ensure exact match including protocol, domain, and path
- Check for trailing slashes
- Verify HTTPS vs HTTP
Issue: "Invalid Client"
Cause: Client ID or Client Secret is incorrect.
Solution:
- Verify credentials from the dashboard
- Check for copy-paste errors
- Ensure no extra spaces or characters
Issue: "Authorization Code Expired"
Cause: Authorization codes have a short lifespan (usually 10 minutes).
Solution:
- Exchange codes immediately after receiving them
- Implement proper error handling
- Request new authorization if needed
Issue: "Access Token Invalid"
Cause: Token has expired or been revoked.
Solution:
- Check token expiration time
- Implement refresh token logic
- Re-authorize user if refresh fails
Issue: API Rate Limiting
Cause: Too many requests in a short time period.
Solution:
- Implement exponential backoff
- Cache responses when appropriate
- Monitor rate limit headers
Screenshot: Common issues and solutions
Testing Your Integration
1. Test Environment Setup
- Use a test account for development
- Set up a local HTTPS server for testing
- Use tools like ngrok for local development
2. Test Scenarios
- ✅ Successful authorization flow
- ✅ User denies authorization
- ✅ Invalid client credentials
- ✅ Expired authorization code
- ✅ Invalid redirect URI
- ✅ Token refresh functionality
- ✅ API requests with valid tokens
- ✅ API requests with expired tokens
3. Debugging Tools
- Browser developer tools
- Network request inspection
- OAuth debugging extensions
- Server logs analysis
Additional Resources
API Documentation
- Base URL:
https://trimlink.ai/api/1.0/ - Rate Limits: 60 requests per minute
- Authentication: Bearer token required
- Response Format: JSON
Support and Help
- Documentation:
/docs/api-documentation - Support Email:
[email protected] - Status Page:
https://status.trimlink.ai
Useful Links
Last Updated: January 17, 2025
Version: 1.0
API Version: 1.0
For technical support or questions about this documentation, please contact our support team at [email protected].